
Ever stared at the labyrinthine fuse box under your 2007 Ford Explorer’s hood and felt a wave of confusion wash over you? You’re not alone. The fuse box, a crucial component of your vehicle’s electrical system, can seem like an enigma to the uninitiated. But fear not, this guide will equip you with the knowledge to confidently navigate the world of fuses and relays, empowering you to diagnose and fix electrical issues like a pro.

Image: circuitpartbauer.z19.web.core.windows.net
Knowing your 2007 Ford Explorer’s fuse box layout is vital for several reasons. From identifying why your headlights won’t turn on to troubleshooting a malfunctioning power window, understanding your fuse box can mean the difference between a quick fix and a frustrating trip to the mechanic. This guide will serve as your ultimate roadmap, dissecting the fuse box’s complexities and providing you with the tools to master electrical troubleshooting.
Understanding the Basics: Fuses and Relays
The Role of Fuses
Fuses act as the first line of defense against electrical overload. They are small, cylindrical devices containing a thin wire specifically designed to melt and break the circuit if the current exceeds a predetermined limit. The melting wire effectively “burns out” the fuse, preventing damage to your vehicle’s wiring and potentially dangerous electrical fires.
Relays: The Electrical Switches
While fuses protect your electrical system, relays act as the “switch” for specific electrical circuits. They are electromagnetic devices that use a small current to control a larger current flow. This allows for the activation of high-power components like headlights, starter motors, or power seats, without these components directly drawing current from the battery.
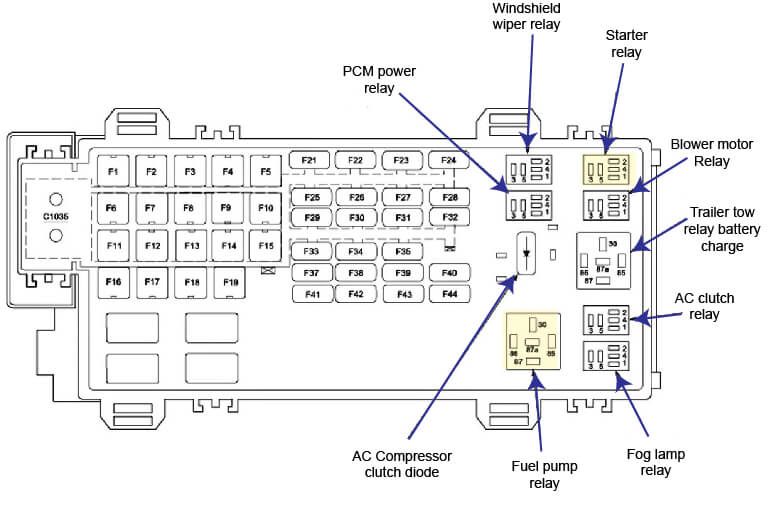
Image: ricksfreeautorepairadvice.com
The 2007 Ford Explorer Fuse Box: A Detailed Look
Location, Location, Location: Finding the Fuse Boxes
The 2007 Ford Explorer boasts two fuse boxes: a main fuse box under the hood and a smaller passenger compartment fuse box. The main fuse box is typically located in the engine bay, near the battery. The passenger compartment fuse box is usually found on the driver’s side, beneath the dashboard, near the steering column.
Deciphering the Fuse Box Diagram: Your Key to Success
The fuse box diagram is the Rosetta Stone to understanding your 2007 Ford Explorer’s electrical system. It acts as a visual key that maps out the location of each fuse and its corresponding circuit. You can usually find the diagram printed on the inside of the fuse box lid or in your owner’s manual. The diagram typically lists each fuse’s amperage (the maximum current it can handle) and the associated electrical component. For example, it might show you that fuse number 15 is rated at 10 amps and controls the left front headlamp.
Essential Fuse Box Terminology: Understanding the Lingo
To navigate the fuse box effectively, you need to know some key terms:
- Fuse: The replaceable element that breaks the circuit in case of overload.
- Amperage: The maximum amount of current a fuse can handle before melting.
- Circuit: The path of electrical current from the battery to the component.
- Relay: An electromagnetic switch that controls the flow of larger currents.
Troubleshooting Electrical Problems: A Step-by-Step Guide
1. Identifying the Issue: Pinpointing the Problem
Before you start pulling fuses, identify the specific electrical issue you’re trying to address. For example, are your headlights not working, is your power window stuck, or is your radio dead?
2. Consulting the Fuse Box Diagram: Finding the Right Fuse
Once you know what’s malfunctioning, consult the fuse box diagram to locate the fuse responsible for that component. For example, if your headlights aren’t working, the diagram might point you to fuse number 15 or 16.
3. Visual Inspection: Examining the Fuse
Carefully inspect the fuse to see if the internal wire is broken or melted. A blown fuse will appear darker than the other fuses. Note that sometimes a fuse might be blown and not visibly melted, so it’s always a good idea to replace suspicious fuses.
4. Replacing the Fuse: A Simple Fix
If your fuse is blown, replace it with a new one of the same amperage. Avoid using a fuse with a higher amperage as this can lead to overheating and damage to your wiring.
5. Relay Testing: When the Fuse is Not the Culprit
If you’ve replaced the fuse, but your problem persists, the issue could lie with the relay. You can test the relay by disconnecting it and using a multimeter to check for continuity. If the relay is faulty, it needs to be replaced.
Safety Precautions: Working with Electricity
Always remember that working with electrical systems can be dangerous. Here are some safety precautions to take:
- Disconnect the battery before working on the fuse box.
- Never use a fuse with a higher amperage than the original one.
- Ensure that your hands are dry when working on electrical components.
- If you’re unsure about anything, consult a professional mechanic.
Beyond the Basics: Understanding Advanced Fuse Box Applications
Power Distribution: The Backbone of Electrical Systems
The fuse box plays a critical role in power distribution within your car. It acts as a central hub, channeling electricity from the battery to various components throughout your vehicle. Each fuse acts as a dedicated pathway for current, ensuring that individual circuits don’t overload and damage other parts of your car. Think of it like a miniature electrical grid for your vehicle.
Fuse Box as a Diagnostic Tool: Understanding Electrical Signals
The fuse box is not just a passive protector, but also a valuable diagnostic tool. Experienced mechanics can use multimeters to measure voltage and resistance across fuses and relays. This information can help them narrow down electrical faults and identify the root cause of a particular problem. Understanding the fuse box’s role in diagnostic procedures can enhance your knowledge of your car and make you a more informed driver.
2007 Ford Explorer Fuse Box Diagram
Conclusion: Empower yourself with the Knowledge of Your Fuse Box
The 2007 Ford Explorer fuse box might seem daunting, but by understanding its intricacies, you can transform yourself into a capable electrical troubleshooter. Armed with the knowledge of fuse box diagrams and the confidence to diagnose and fix common electrical problems, you’ll be able to keep your Explorer running smoothly and avoid costly trips to the mechanic.
Remember, this guide is just the starting point. Refer to your owner’s manual for additional information and always consult a professional mechanic if you’re unsure about any repairs or procedures. Enjoy the freedom and confidence of understanding your vehicle’s electrical system, ensuring a worry-free driving experience.


