
Have you ever found yourself in a network with multiple VLANs (Virtual Local Area Networks) and struggled to get devices on different VLANs to communicate? The world of networking can be a labyrinth, filled with protocols and configurations that seem to defy logic. But fret not, for today we’re going to unravel the mysteries of inter-VLAN routing, exploring a powerful technique known as “router-on-a-stick.” Get ready to understand the magic behind this configuration and how it seamlessly enables communication between VLANs – a skill every network administrator should master.

Image: spapassa.weebly.com
Imagine a bustling city with distinct neighborhoods, each with its own unique character and purpose. These neighborhoods represent VLANs in our networking world, each separated from the others to improve security and performance. But what happens when residents from different neighborhoods need to connect and share information? This is where the router-on-a-stick configuration steps in – a clever way to let VLANs talk to each other, just like bridges connecting different neighborhoods in a city.
Unveiling the Router-on-a-Stick: A Tale of Efficient Connectivity
The router-on-a-stick configuration is a brilliant design principle that uses a single interface on a router to act as a gateway for multiple VLANs, saving valuable router resources and streamlining network management. It’s like a single tollbooth for traffic entering and exiting different neighborhoods in our city analogy. But how does it truly work?
A Step-by-Step Walkthrough: Crafting Your Router-on-a-Stick
- VLAN Configuration: Assign each VLAN a distinct ID and configure the necessary VLANs on your router. Picture each VLAN as a unique neighborhood, with its own dedicated identity.
- Subinterface Creation: Now, create subinterfaces on the router’s single physical interface, one subinterface for each configured VLAN. Think of each subinterface as a specialized tollbooth on the bridge connecting different neighborhoods.
- Interface Assignment: Assign each subinterface to a specific VLAN ID, ensuring that traffic from the respective VLAN will be routed through that subinterface. This creates a clear and organized pathway for traffic flow between the VLANs.
- IP Addressing: Assign an IP address to each subinterface. Each tollbooth needs to understand its address so it can correctly direct traffic.
- Routing Configuration: Define static routes or configure Dynamic Routing Protocols (RIP, OSPF, EIGRP) to allow the router to learn and communicate with other networks. This helps the router act as a central hub, guiding traffic between the different neighborhoods.
Understanding the Benefits: Why Router-on-a-Stick is a Networking Powerhouse
- Resource Efficiency: A single interface can act as a gateway for multiple VLANS, maximizing use of valuable router resources, like memory and CPU power.
- Simplified Management: Managing a single router interface for multiple VLANs is far easier than configuring multiple interfaces, making network maintenance a breeze.
- Enhanced Security: By isolating traffic within VLANs, router-on-a-stick configuration reinforces network security by limiting communication between different security zones.
- Cost-Effective Solution: This cost-effective design requires fewer physical network cards and interfaces compared to dedicated routers for each VLAN, leading to significant cost savings over time.
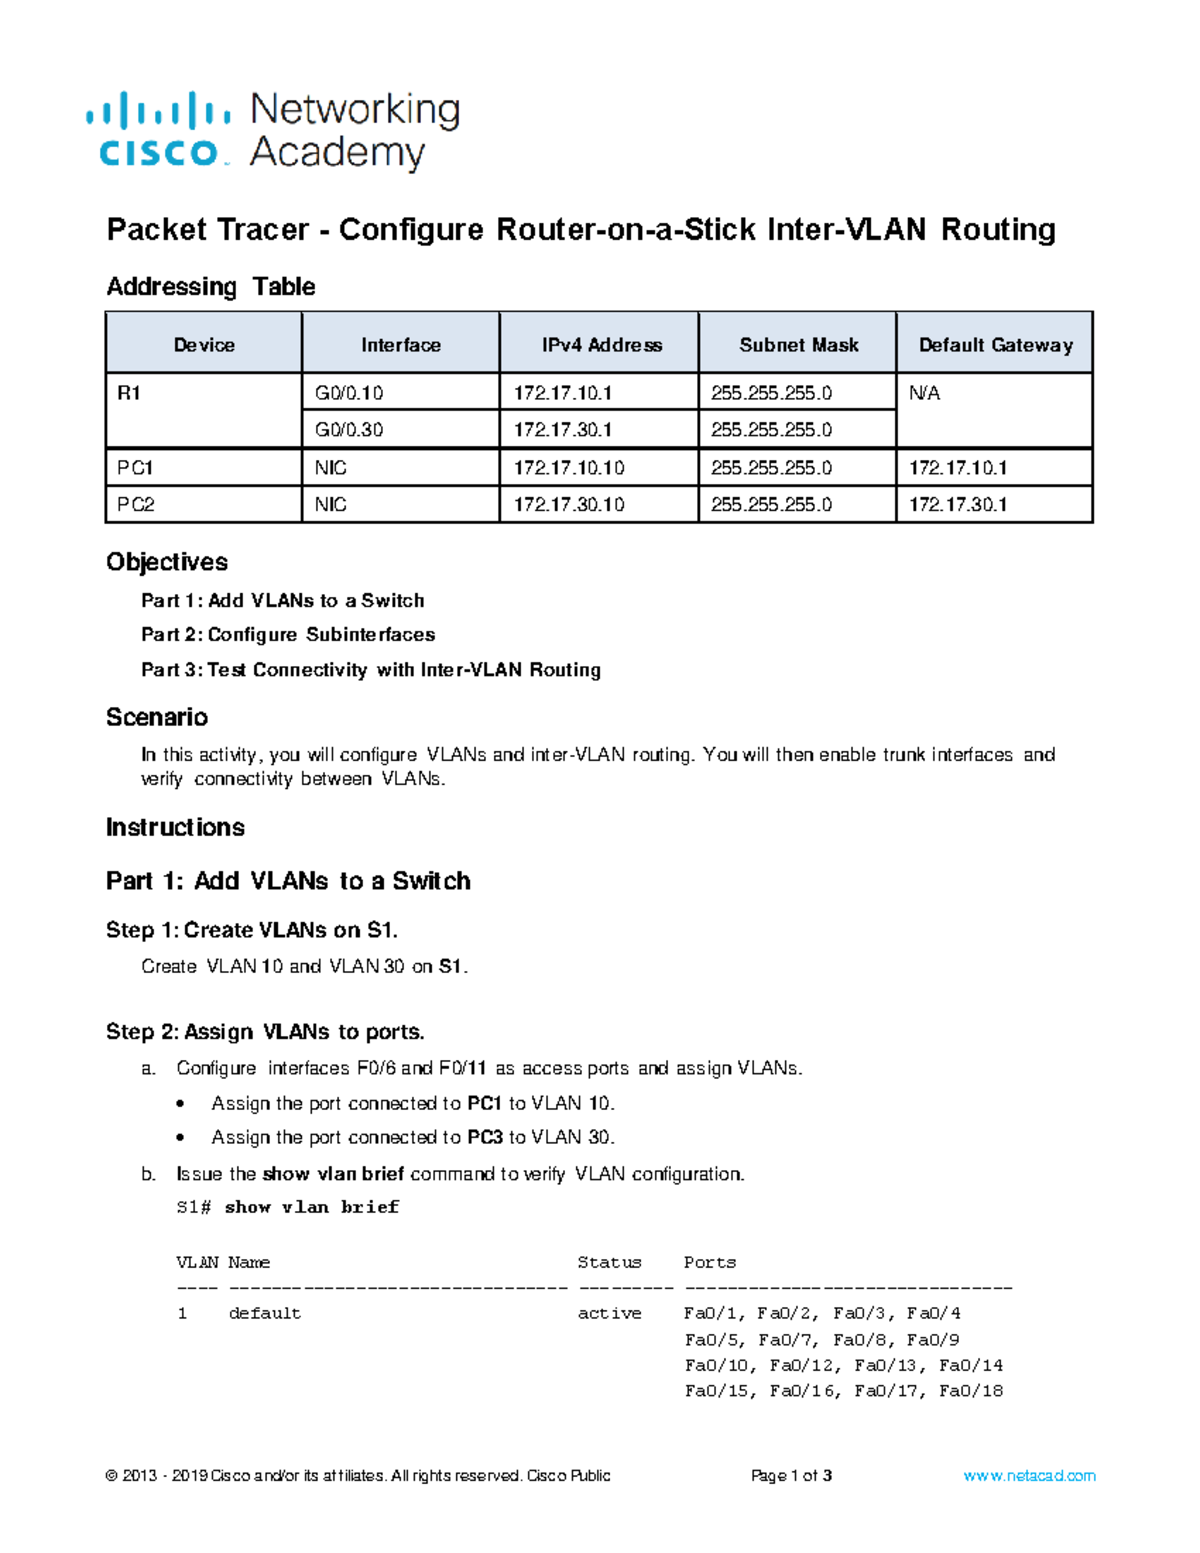
Image: www.studocu.com
Navigating the Router-on-a-Stick with Cisco Packet Tracer
Now that we’ve grasped the core concepts, let’s dive into a real-world example using Cisco Packet Tracer, a powerful network simulation tool. We’ll configure a router-on-a-stick setup and witness how traffic flows between VLANs.
Step 1: Setting up the Network:
- Build your network topology with two VLANs (VLAN 10 and VLAN 20), each with devices connected to their respective VLANs.
- Connect a router to a switch, acting as a central point of interconnection between the VLANs.
Step 2: Configuration:
- Configure the VLANs on the router, specifying the VLAN IDs (10 and 20) and assigning relevant ports to each VLAN. Think of it as assigning physical locations on the bridge to each neighborhood.
- Create subinterfaces on the router’s interface connected to the switch, one subinterface per VLAN. Make sure you choose the same VLAN ID as the subinterface, providing a direct connection between the router and the VLAN.
- Configure IP addresses for both subinterfaces, providing a unique address for each, enabling the router to communicate with each VLAN.
- Create routes to connect each VLAN to other networks, ensuring that traffic from one VLAN can reach its destination through other VLANs.
Step 3: Testing Connectivity:
- Test communication between devices in different VLANs by pinging or transferring files. Confirm that devices can reach each other successfully and traffic is flowing through the router-on-a-stick.
Analyzing the Results:
- Watch as packets flow through the router interface, tracing their path as they move between VLANs.
- Observe the router’s configuration and understand how it processes and routes traffic based on the VLANs and subinterfaces established.
Beyond the Basics: Optimizing Your Router-on-a-Stick Setup
While the router-on-a-stick configuration is powerful, there’s always room for improvement. Here are some additional considerations to take your configuration to the next level:
- VLAN Trunking: Utilize protocols like 802.1q (VLAN Tagging) to transport multiple VLANs over a single physical link, further enhancing efficiency.
- Dynamic Routing: Implement Dynamic Routing protocols like RIP (Routing Information Protocol), OSPF (Open Shortest Path First), or EIGRP (Enhanced Interior Gateway Routing Protocol) to simplify network management and ensure that your router learns about network connections automatically.
4.2.7 Packet Tracer – Configure Router-On-A-Stick Inter-Vlan Routing
Harnessing the Power of Router-on-a-Stick: Transforming Your Network
By understanding and mastering the router-on-a-stick configuration, you gain a powerful tool to manage and secure your network effectively. This configuration enables seamless communication between VLANs, maximizing resource utilization, streamlining management, and ultimately unlocking a more efficient and secure network experience. Embrace the knowledge, experiment with Packet Tracer, and watch your network grow in strength and performance!


